I’ve seen several examples of creating document converters in SharePoint that convert documents to PDF format, using tools like Aspose and other print-based solutions.
I recently did a proof of concept for a customer that used a different product, Outside In PDF Export from Oracle. This is an interpretive converter that can take a slew of file formats (including MS Office) and automatically convert them into a PDF file. If you aren’t familiar with PDF conversion, there are two basic kinds:
- Print based conversion – This is the Acrobat Distiller approach. Uses a printer driver that accepts the PostScript output from an application (such as Microsoft Word), and converts it to PDF. This approach results in the most accurate conversions, but is hardest to automate because it involves opening the native application and automating its “Print” functionality.
- Interpretive conversion – This is an approach that reads the contents of a native file format and translates the contents into PDF format. This results in potentially less accurate conversions, but is much easier to automate.
Outside In, and in particular the PDF Export SDK, is an EXE and set of DLLs that contains logic to covert over 400 different file types to PDF. In combination with Transformation Server (a web services wrapper to PDF Export), you can create SharePoint Document Converters that will convert your documents to PDF format.
How I Did It
For the proof of concept, I followed these steps to get it working
- Download PDF Export, Transformation Server, and SrvAny.exe.
- Install and Configure the Transformation Server and Web Service
- Develop and Install the Document Converter
Download of PDF Export 8.3.0 and Transformation Server 8.2.0
You can download both products here:
http://www.oracle.com/technology/products/content-management/oit/oit_dl_otn.html
You’ll have to register with an Oracle account to get it, but it is a freely available trial version, and does not appear to have any trial expiration limitations.
You will also need SrvAny.exe to run Transformation Server as a Windows Service. I found this site that had a download:
http://www.tacktech.com/display.cfm?ttid=197
Install and Configure the Transformation Server and Web Service
Extract the contents of the Transformation Server zip you downloaded to a folder on your server that will do the document conversions (e.g. “C:PDFConverter”). There will be a bunch of dlls, some wsdl files (we’ll use those later), some EXE’s (which are run as a service), and some XML config files.
Transformation Server doesn’t really know anything about PDF generation, it is just a web service wrapper, so we’ll need to place the PDF Export library into our folder so it can use it. Extract the contents of PDF Export 8.3.0 to a separate folder on your machine. Grab every DLL in the root folder, as well as exporter.exe, px.cfg, and cmmap000.bin and copy those files into “C:PDFConverter”.
Open the file called server_startup.xml in “C:PDFConverter”. This configures the service to listen on a specific port and hostname/ip address. I went ahead and changed the port, but you can leave it as is if you wish, just make note of the port for later:
|
|
<span style="color: #008000"><!--Connections are the TCP/IP socket connections that the server accepts from clients.--></span> |
|
|
<span style="color: #0000ff"><</span><span style="color: #800000">connectionsInfo</span> <span style="color: #ff0000">xsi:type</span><span style="color: #0000ff">="tss:ConnectionsInfo"</span><span style="color: #0000ff">></span> |
|
|
<span style="color: #008000"><!--The serverName is the host name, or dotted IP address that the server will use when establishing its presence on the network.--></span> |
|
|
<span style="color: #0000ff"><</span><span style="color: #800000">serverName</span> <span style="color: #ff0000">xsi:type</span><span style="color: #0000ff">="xsd:string"</span><span style="color: #0000ff">></span>localhost<span style="color: #0000ff"></</span><span style="color: #800000">serverName</span><span style="color: #0000ff">></span> |
|
|
<span style="color: #008000"><!--The port is the TCP/IP port that the server will establish a listener on for accepting connections.--></span> |
|
|
<span style="color: #0000ff"><</span><span style="color: #800000">port</span> <span style="color: #ff0000">xsi:type</span><span style="color: #0000ff">="xsd:unsignedInt"</span><span style="color: #0000ff">></span>9000<span style="color: #0000ff"></</span><span style="color: #800000">port</span><span style="color: #0000ff">></span> |
|
|
<span style="color: #008000"><!--The server will disconnect idle connections that have remained idle for too long. The activityTimeout sets the period of time a connection must be idle before it will be disconnected by the server.--></span> |
|
|
<span style="color: #0000ff"><</span><span style="color: #800000">activityTimeoutSecs</span> <span style="color: #ff0000">xsi:type</span><span style="color: #0000ff">="xsd:unsignedInt"</span><span style="color: #0000ff">></span>1800<span style="color: #0000ff"></</span><span style="color: #800000">activityTimeoutSecs</span><span style="color: #0000ff">></span> |
|
|
<span style="color: #0000ff"></</span><span style="color: #800000">connectionsInfo</span><span style="color: #0000ff">></span> |
Go ahead and double-click tsmanager.exe to make sure it is working. It should open a console window and show you what host/port it is listening on.
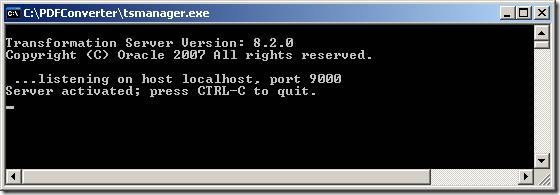
Press Ctrl + C to quit.
Now we need to run this program as a service, so that it is always available, even when nobody is logged on to the server. Place instsrv.exe and srvany.exe in your C:PDFConverter folder. Run the following command prompt:
|
|
C:PDFConverter<span style="color: #0000ff">></span>instsrv.exe "Transformation Server" c:PDFConvertersrvany.exe The service was successfuly added! Make sure that you go into the Control Panel and use the Services applet to change the Account Name and Password that this newly installed service will use for its Security Context. |
Open regedit, and browse to HKEY_LOCAL_MACHINESYSTEMCurrentControlSetServicesTransformation Server.
Create a new key called Parameters, and add a new string value inside this key called Application, with a value of C:PDFConvertertsmanager.exe.
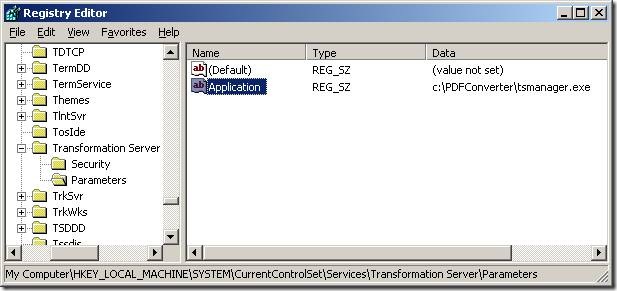
Go to the services console and start the Transformation Server service. Optionally, you can also go to the Properties for this service account, and change the Identity that this service runs under.
Develop the Document Converter
Create a new .NET C# console application project and solution from within Visual Studio 2008, called PDFConverter.
Right-click the project in Solution Explorer and choose Add Service Reference…
Since the wsdl files for Transformation Server are not compliant with WCF services, choose the Advanced… button on the Add Service Reference dialog, and then choose the Add Web Reference… button to add a .NET 2.0 style web service reference. In the Add Web Reference dialog, enter the path to the wsdl file: C:PDFConvertertransform_net_2005.wsdl. Hit Go.
Once your web reference has resolved, enter TransformationServer in the Web reference name box and click the Add Reference button.
Open your Properties/Settings.settings file. There will be one setting in the file for the web service URL. Change this to the right hostname/port in your server_settings.xml for Transformation Server. Make sure to include a trailing “/transform” on the end, e.g.:
http://www.lifeonplanetgroove.com/transform
A document converter is just a console EXE that is called by SharePoint with command line arguments, so we’ll setup our console app to handle the arguments. In Program.cs, before static void Main, add the following code (taken from the WSS SDK here):
|
|
<span style="color: #cc6633">#region</span> Argument Handling Data |
|
|
<span style="color: #0000ff">private</span> <span style="color: #0000ff">enum</span> ArgumentCode |
|
|
<span style="color: #0000ff">private</span> <span style="color: #0000ff">struct</span> ArgumentPair |
|
|
<span style="color: #0000ff">public</span> ArgumentPair(ArgumentCode c, <span style="color: #0000ff">string</span> s) |
|
|
<span style="color: #0000ff">this</span>.argType = c; |
|
|
<span style="color: #0000ff">this</span>.argFlagString = s; |
|
|
<span style="color: #0000ff">public</span> ArgumentCode argType; |
|
|
<span style="color: #0000ff">public</span> <span style="color: #0000ff">string</span> argFlagString; |
|
|
<span style="color: #0000ff">private</span> <span style="color: #0000ff">static</span> ArgumentPair[] PossibleArguments = <span style="color: #0000ff">new</span> ArgumentPair[] { |
|
|
<span style="color: #0000ff">new</span> ArgumentPair(ArgumentCode.Help, <span style="color: #006080">"-?"</span>), |
|
|
<span style="color: #0000ff">new</span> ArgumentPair(ArgumentCode.Help, <span style="color: #006080">"-help"</span>), |
|
|
<span style="color: #0000ff">new</span> ArgumentPair(ArgumentCode.InputFile, <span style="color: #006080">"-in"</span>), |
|
|
<span style="color: #0000ff">new</span> ArgumentPair(ArgumentCode.OutputFile, <span style="color: #006080">"-out"</span>), |
|
|
<span style="color: #0000ff">new</span> ArgumentPair(ArgumentCode.LogFile, <span style="color: #006080">"-log"</span>), |
|
|
<span style="color: #0000ff">new</span> ArgumentPair(ArgumentCode.ConfigFile, <span style="color: #006080">"-config"</span>), |
|
|
<span style="color: #0000ff">private</span> <span style="color: #0000ff">static</span> Dictionary<ArgumentCode, <span style="color: #0000ff">string</span>> actualArguments = <span style="color: #0000ff">new</span> Dictionary<ArgumentCode, <span style="color: #0000ff">string</span>>(); |
|
|
<span style="color: #cc6633">#endregion</span> |
|
|
<span style="color: #008000">/// <summary></span> |
|
|
<span style="color: #008000">/// Prints out the usage help to the console.</span> |
|
|
<span style="color: #008000">/// </summary></span> |
|
|
<span style="color: #0000ff">static</span> <span style="color: #0000ff">void</span> PrintUsage() |
|
|
Console.WriteLine(<span style="color: #006080">"Usage: {0} -in <inputfilename> -out <outputfilename> -config <configfilename> [-log <logfilename>]"</span>, |
|
|
Assembly.GetExecutingAssembly().ManifestModule.Name); |
Add the following code inside static void Main:
|
|
<span style="color: #cc6633">#region</span> Argument Handling Code |
|
|
<span style="color: #008000">// Read arguments.</span> |
|
|
<span style="color: #0000ff">for</span> (<span style="color: #0000ff">int</span> i = 0; i < args.Length; i++) |
|
|
<span style="color: #0000ff">bool</span> argumentValid = <span style="color: #0000ff">false</span>; |
|
|
<span style="color: #0000ff">foreach</span> (ArgumentPair ap <span style="color: #0000ff">in</span> PossibleArguments) |
|
|
<span style="color: #0000ff">if</span> (String.Compare(ap.argFlagString, args[i], StringComparison.OrdinalIgnoreCase) == 0) |
|
|
<span style="color: #0000ff">switch</span> (ap.argType) |
|
|
<span style="color: #0000ff">case</span> ArgumentCode.Help: |
|
|
<span style="color: #0000ff">return</span>; |
|
|
<span style="color: #0000ff">case</span> ArgumentCode.InputFile: |
|
|
<span style="color: #0000ff">case</span> ArgumentCode.OutputFile: |
|
|
<span style="color: #0000ff">case</span> ArgumentCode.ConfigFile: |
|
|
<span style="color: #0000ff">case</span> ArgumentCode.LogFile: |
|
|
<span style="color: #0000ff">if</span> (i + 1 < args.Length) |
|
|
actualArguments[ap.argType] = args[i + 1]; |
|
|
argumentValid = <span style="color: #0000ff">true</span>; |
|
|
<span style="color: #0000ff">break</span>; |
|
|
<span style="color: #0000ff">break</span>; |
|
|
<span style="color: #0000ff">if</span> (!argumentValid) |
|
|
Console.WriteLine(<span style="color: #006080">"unknown argument {0}"</span>, args[i]); |
|
|
<span style="color: #0000ff">return</span>; |
|
|
<span style="color: #008000">// Validate arguments.</span> |
|
|
<span style="color: #0000ff">if</span> (!actualArguments.ContainsKey(ArgumentCode.InputFile) || |
|
|
String.IsNullOrEmpty(actualArguments[ArgumentCode.InputFile]) || |
|
|
!actualArguments.ContainsKey(ArgumentCode.OutputFile) || |
|
|
String.IsNullOrEmpty(actualArguments[ArgumentCode.OutputFile]) || |
|
|
!actualArguments.ContainsKey(ArgumentCode.ConfigFile) || |
|
|
String.IsNullOrEmpty(actualArguments[ArgumentCode.ConfigFile])) |
|
|
Console.WriteLine(<span style="color: #006080">"required argument missing"</span>); |
|
|
<span style="color: #0000ff">return</span>; |
|
|
<span style="color: #cc6633">#endregion</span> |
Now that the command line arguments can be parsed, it is time to use the web service and do the document conversion. The Transformation Server download contained some code samples for C#, and I was able to basically use as-is, only modifying the input and output file paths. After the argument handling code in static void Main, add the following code:
|
|
TransformationServer.transform t = <span style="color: #0000ff">new</span> TransformationServer.transform(); |
|
|
TransformationServer.IOSpec source = <span style="color: #0000ff">new</span> TransformationServer.IOSpec(); |
|
|
source.spec = <span style="color: #0000ff">new</span> TransformationServer.stringData(); |
|
|
source.spec.base64 = <span style="color: #0000ff">false</span>; |
|
|
source.spec.charset = TransformationServer.CharacterSetEnum.windows1250; |
|
|
source.spec.str = actualArguments[ArgumentCode.InputFile]; |
|
|
source.specType = <span style="color: #006080">"path"</span>; |
|
|
TransformationServer.IOSpec sink = <span style="color: #0000ff">new</span> TransformationServer.IOSpec(); |
|
|
sink.spec = <span style="color: #0000ff">new</span> TransformationServer.stringData(); |
|
|
sink.spec.base64 = <span style="color: #0000ff">false</span>; |
|
|
sink.spec.charset = TransformationServer.CharacterSetEnum.windows1250; |
|
|
sink.spec.str = actualArguments[ArgumentCode.OutputFile]; |
|
|
sink.specType = <span style="color: #006080">"path"</span>; |
|
|
<span style="color: #0000ff">string</span> outputFormat = <span style="color: #006080">"pdf"</span>; |
|
|
<span style="color: #0000ff">string</span> optionSet = <span style="color: #006080">""</span>; |
|
|
TransformationServer.Option[] options = <span style="color: #0000ff">new</span> TransformationServer.Option[0]; |
|
|
TransformationServer.stringData resultMsg; |
|
|
TransformationServer.IOSpec[] resultDocs; |
|
|
UInt32 result = t.Transform(source, sink, outputFormat, optionSet, options, <span style="color: #0000ff">out</span> resultMsg, <span style="color: #0000ff">out</span> resultDocs); |
|
|
Console.WriteLine(<span style="color: #006080">"The result is {0} {1}"</span>, result, resultMsg.str); |
|
|
<span style="color: #0000ff">foreach</span> (TransformationServer.IOSpec ios <span style="color: #0000ff">in</span> resultDocs) |
|
|
ASCIIEncoding encoding = <span style="color: #0000ff">new</span> ASCIIEncoding(); |
|
|
<span style="color: #0000ff">string</span> constructedString = encoding.GetString(Convert.FromBase64String(ios.spec.str)); |
|
|
Console.WriteLine(<span style="color: #006080">" {0}"</span>, constructedString); |
Most of this code is cut-and-paste from the sample, and we are just swapping the input file path (source.spec.str) and output file path (sink.spec.str) with the arguments from the command line.
Installing the Converter
To install the converter, you need to create a feature file, install the feature, and place the converter EXE in the proper directory.
Create a feature.xml file and add the following:
|
|
<span style="color: #0000ff"><</span><span style="color: #800000">Feature</span> <span style="color: #ff0000">xmlns</span><span style="color: #0000ff">="http://schemas.microsoft.com/sharepoint/"</span> |
|
|
<span style="color: #ff0000">Id</span><span style="color: #0000ff">="{9E2A5231-0D81-4de8-8504-36A61026680E}"</span> |
|
|
<span style="color: #ff0000">Title</span><span style="color: #0000ff">="PDF Converter"</span> |
|
|
<span style="color: #ff0000">Description</span><span style="color: #0000ff">="PDF Converter."</span> |
|
|
<span style="color: #ff0000">Scope</span><span style="color: #0000ff">="WebApplication"</span><span style="color: #0000ff">></span> |
|
|
<span style="color: #0000ff"><</span><span style="color: #800000">ElementManifests</span><span style="color: #0000ff">></span> |
|
|
<span style="color: #0000ff"><</span><span style="color: #800000">ElementManifest</span> <span style="color: #ff0000">Location</span><span style="color: #0000ff">="Elements.xml"</span><span style="color: #0000ff">/></span> |
|
|
<span style="color: #0000ff"><</span><span style="color: #800000">ElementFile</span> <span style="color: #ff0000">Location</span><span style="color: #0000ff">="PDFConverter.exe"</span><span style="color: #0000ff">/></span> |
|
|
<span style="color: #0000ff"></</span><span style="color: #800000">ElementManifests</span><span style="color: #0000ff">></span> |
|
|
<span style="color: #0000ff"></</span><span style="color: #800000">Feature</span><span style="color: #0000ff">></span> |
Create an Elements.xml file, and add the following code. You can create as many document converter nodes as you need for each file type you want to convert (just make sure each has a unique guid).
|
|
<span style="color: #0000ff"><</span><span style="color: #800000">Elements</span> <span style="color: #ff0000">xmlns</span><span style="color: #0000ff">="http://schemas.microsoft.com/sharepoint/"</span><span style="color: #0000ff">></span> |
|
|
<span style="color: #0000ff"><</span><span style="color: #800000">DocumentConverter</span> <span style="color: #ff0000">Id</span><span style="color: #0000ff">="{513130EB-A1BC-46d3-919C-1E00B6BCA742}"</span> |
|
|
<span style="color: #ff0000">Name</span><span style="color: #0000ff">="DOCX to PDF Converter"</span> |
|
|
<span style="color: #ff0000">App</span><span style="color: #0000ff">="PDFConverter.exe"</span> |
|
|
<span style="color: #ff0000">From</span><span style="color: #0000ff">="docx"</span> |
|
|
<span style="color: #ff0000">To</span><span style="color: #0000ff">="pdf"</span> |
|
|
<span style="color: #0000ff">/></span> |
|
|
<span style="color: #0000ff"><</span><span style="color: #800000">DocumentConverter</span> <span style="color: #ff0000">Id</span><span style="color: #0000ff">="{E7374437-157E-4fb4-A4E9-A19026BAE17A}"</span> |
|
|
<span style="color: #ff0000">Name</span><span style="color: #0000ff">="VSD to PDF Converter"</span> |
|
|
<span style="color: #ff0000">App</span><span style="color: #0000ff">="PDFConverter.exe"</span> |
|
|
<span style="color: #ff0000">From</span><span style="color: #0000ff">="vsd"</span> |
|
|
<span style="color: #ff0000">To</span><span style="color: #0000ff">="pdf"</span> |
|
|
<span style="color: #0000ff">/></span> |
|
|
<span style="color: #0000ff"></</span><span style="color: #800000">Elements</span><span style="color: #0000ff">></span> |
Place both these files in a folder called PDFConverter in your …/12/TEMPLATE/Features folder, and use stsadm to activate the feature on a particular web application.
|
|
C:Program FilesCommon FilesMicrosoft Sharedweb server extensions12BIN<span style="color: #0000ff">></span>stsadm -o installfeature -name PDFConverter Operation completed successfully. C:Program FilesCommon FilesMicrosoft Sharedweb server extensions12BIN<span style="color: #0000ff">></span>stsadm -o activatefeature -name PDFConverter -url http://mossdev:8080 Operation completed successfully. |
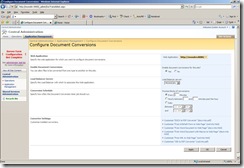
After activating the feature, go to Central Administration, Applications tab, and click the Document Conversions link. Ensure that your web application has document conversions turned on. You should see your document converters in the list at the bottom of the screen:
Since you are using a Web Service, a proxy class needs to be generated dynamically, and so you’ll need to give your SharePoint Document Conversion User Account rights to create this in C:WindowsTemp (or whatever your system temp directory is). Grant List Folder Contents and Read permissions to the Document Conversion account (usually a local machine account that starts with “HVU_”) on your Temp folder.
The Document Conversion service stores temporary documents in the following folder: C:Program FilesMicrosoft Office Servers12.0BINHtmlTrLauncher. By default, this folder only grants the Document Conversion User account access. Since the Transformation Server windows service is running under its own account, you need to give this account access to the folder. Grant the account that your Transformation Server windows service is running under Read and Write access to this folder.
The last step involves copying over your compiled console EXE and exe.config file into the following SharePoint folder (the actual path may vary depending on your setup, but you should be able to find the TransformApps folder):
C:Program FilesMicrosoft Office Servers12.0TransformApps
Results
Navigate to your SharePoint site. Upload a document into your document library (make sure it is a file extension that you’ve configured in your Elements.xml file). Open the drop down menu and choose Convert Document. Your document converter should appear in the list. Run the conversion. After around a minute if you refresh your document library and all went well, you should see your PDF file in the library.
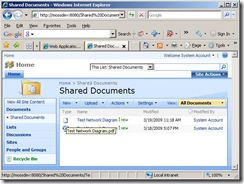
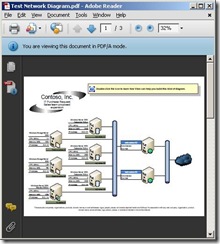
Here is a picture of a generated Visio document in PDF format, not too bad:
