The Blog

If you’ve used the InfoPath Contact Selector before, you might have seen that it does not support validation like other InfoPath controls do. There is no option on the Properties dialog for the control to make it a required field. To work around this, I used a combination of rules and conditional formatting to prevent the form from being submitted if the control does not have a value.

The easiest way to do this is to create conditional rules in the Submit Options dialog:

  1. Configure your form and add a Contact Selector control (see this article for instructions).
  2. Go to Tools > Submit Options.
  3. Make sure that Allow Users to Submit this Form is checked.
  4. Click the option to Perform custom action using rules.
  5. Click the Rules… button.
  6. In the Rules dialog, click the Add… button.
  7. In the Rule dialog, click the Set Condition… button.
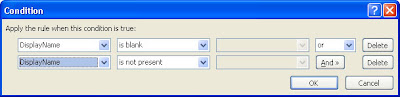
  8. In the Condition dialog, pull down the first dropdown, choose Select a field or group…, and drill down and choose the DisplayName field from your data connection. Select is blank in the second dropdown.
  9. Click the And> button to add a second condition.
  10. In the last dropdown on the first condition, change it from And to Or.
  11. In the second condition, select the DisplayName field again, and choose is not present for the condition. Your two conditions should look like this:
  12. Click OK. In the Rule dialog, do not add any Actions. Check the box to Stop processing rules when this rule finishes.
  13. Make sure that this rule appears first in the list of Rules.

The only downside to this approach is that there is no visual to the user, since InfoPath Forms Services does not support showing a dialog message. The form will just not do anything. To get an even better user experience, You can hide the Submit option from the Toolbar, and use your own Submit buttons with Conditional Formatting:

  1. Drag a button on the page.
  2. Right-click and choose Conditional Formatting….
  3. Click Add… to add conditions.
  4. In the Condition dialog, add the two conditions in steps 8-11 above, and choose Disable this Control.

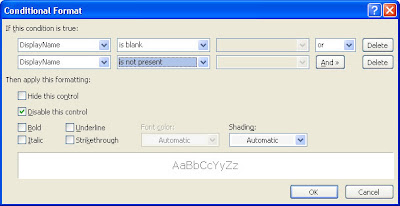
Now, your submit button will be disabled until the user picks a person.

One client had a problem with profile and membership synchronization, and the “My SharePoint Sites” links would not appear for anyone. This also affected the “SharePoint Sites” and “Membership” web parts on users’ MySites – no SharePoint related links would show up in these parts.

We verified that users were explicitly added into the “Members” group of SharePoint sites, we performed full crawls and ran all the timer jobs. Still no dice.

Eventually, a support ticket with MS revealed that having the Content Database set to Offline prevented that functionality from working.

After wrapping up a project that used content types extensively, I decided to write a series of posts detailing the headaches encountered so far.

This is part 2.

List Column Settings and STP Template Files

When you create a site content type, add that content type to a list, and then wrap that site up as an STP site template, none of your list content type column settings are carried over to sites based on the template. This means that if you’ve overridden the Hidden, Required, or Optional settings on the columns in your list content type from the base settings in the site content type, when a new site is provisioned from the site template, all the column overrides will be lost.

It appears that when the STP is packaged up, it only contains pointers to the parent content types, and ignores any list-level overrides to the content types.

Figure 1: List Content Type before STP (Notice the TestNonHiddenColumn is overridden here to be Hidden)

Figure 2: List Content Type after provisioning with STP (Notice the TestNonHiddenColumn is set back to Optional, like it is in the base content type)

Note that this is the same behavior experienced with creating List and Document Library templates as well, which must use a similar approach to templating that STP files use for site templates.

After wrapping up a project that used content types extensively, I decided to write a series of posts detailing the headaches encountered so far.

This is part 1.

Hidden Fields and Inherited Content Types

If you create a site content type through the UI and set a column to hidden, then create another site content type that inherits from the first one, and finally add that content type to a list, the column that was hidden will not be available anywhere in the UI on the list. Note that if you just use the base content type directly in the list, the hidden column WILL be visible in the list UI, and can be used in Views and toggled back to Optional or Required. 

Figure 1: Base Content Type

Figure 2: Child Content Type (notice hidden column is visible)

Figure 3: Child Content Type in List (notice missing column)It appears that Microsoft is assuming that a hidden column in a parent content type should not be able to be overridden once used in a grandchild content type. Whereas, some people might want to use the Hidden option to simply set a default for child content types, which may need to be overridden in particular lists or grandchildren.

The major pain with this is that you cannot regain the visibility of the column through the UI, even if you go back to the parent content type and set the column to Optional or Required. At that point, the column on the list is set to hidden, and has the CanToggleHidden attribute set to false. You have to either delete the content type from the list and re-add it (which will not work if you have list items already using that content type), or you have to resort to reflection to programmatically fix the column.

Ideally, content types created through the UI should have all of the granularity that is present in XML content type definitions. You should be able to specify ShowInEditForm, ShowInViewForm, CanToggleHidden, etc.

I ran into a situation with some custom InfoPath Document Information Panels where I was getting schema validation errors like this one because of a Business Data Column I added to a document library:

“…{guid}ColumnName is unexpected according to content model of parent element ‘documentManagement’.”

You might run into this in the following situation:

  1. You create the DIP on a Site Content Type.
  2. You configure a document library to use your Site Content Type.
  3. You add a custom column to the Document Library (and subsequently to the List Content Type (the local instance of your site content type that is applied to the list)).

In this situation, your Document Information Panel was created without the knowledge of this extra column, and does not have a field in its data source schema for this column. What I believe is happening is that when attempting to view the DIP, SharePoint is passing all the columns on the document library to the InfoPath form, and the form is not expecting this extra column, so it chokes (very lame, Microsoft).

To get around this:

  1. Edit the DIP on the List Content Type (List Settings, click content type name, Document Information Panel Settings, Edit this Template link)
  2. Once the form loads in InfoPath, choose Tools > Convert Main Data Source…
  3. Enter the absolute url to your document library (e.g. http://yoursitecollection/subsite/your doc library name), and click Next.
  4. Finish the wizard and view your Data Source. Expand the nodes and you should see the extra list column appear now.

This is also a great way to update the DIP on your List Content Type, especially if you have locally overridden the Optional/Required/Hidden settings on columns from the parent Site Content Type.

This workaround kind of defeats the whole point of setting the Panel at the Site Content Type level, but that’s the only way I could get it to work.